
Selectable inputs are darkened
Computer Nerd Kev |
Home|About|Projects|Links |
Projects > USBify > Vectrex > Instructions |
USBify Vectrex Instructions |
The USBify Vectrex adapter supports Sony PlayStation 3/4/5 controllers connected by USB or Bluetooth (but not some PlayStation-compatible 3rd party controllers), PC controllers and joysticks connected by USB, and USB mice.
Plug the cable from the adapter into the Vectrex and the controller (or other supported device) into the USB socket. Most controllers should be automatically configured in a sensible way, however some PC controllers may have awkward button assignments by default which can be changed as described in setup mode (see Button and Joystick Settings). Controllers can be connected and disconnected from the USB port without switching off or resetting the Vectrex. USB hubs are not supported.
Note for PlayStation controllers: There are some USB cables designed only for charging. A USB data cable must be used to connect the controller. The Vectrex might not be able to supply enough power to charge up the battery in a flat controller. If the controller isn't recognised it may need to be charged up from a USB charger or other device first, or use the included Y-cable to connect a separate USB power supply (see below). DualShock 3 controllers won't charge from a USB charger - connect it to a console or a PC instead (or use the Y-cable).
DualShock 4 controllers and DualSense controllers have a light on by default. Hold the OPTIONS button and press SHARE to turn this on/off. This setting isn't remembered unless you change it in setup mode (where the light is always on, but changes colour depending on the setting). Note that this doesn't work with the DualSense controllers using Bluetooth connection.
Some controllers may have higher voltage or current requirements than can be supplied from the Vectrex (maximum current from the adapter is 100mA). This includes DualSense (PlayStation 5) controllers connected via USB, and might depend slightly on the Vectrex console. For these, the included Y-splitter cable allows a separate USB power supply (such as a phone charger, not included) to supply power instead of the Vectrex.
Connect the USB plug with 'P' engraved on the plastic of the connector to a USB power supply (charger), and the other USB plug to the adapter. The controller now plugs into the socket on the cable and works as normal.
Bluetooth is supported by connecting a compatible Bluetooth USB dongle to the adapter's USB port.
Note: Bluetooth support is experimental. Only PlayStation controllers (DualShock 3 recommended) and a limited range of Bluetooth dongles are supported ("CSR 4.0" models are recommended). DualShock 4 and DualSense (PS4/5) controllers have a slight lag. Some Bluetooth dongles might require external power (see above), in which case note that controllers might remain connected after the console is turned off until the external power is removed.
Hold Down the button on the top of the adapter while the Vectrex console is turned on to enter pairing mode (it can be released afterwards).
To pair with DualShock 4 (PS4) or DualSense (PS5) controllers, connect the Bluetooth dongle in pairing mode and wait until the dongle's light is on and not blinking, then hold the SHARE and PS buttons on the controller until the light on the controller flashes, then after a little time it should pair with the Bluetooth dongle and begin working as a Vectrex controller.
To pair with DualShock 3 (PS3) controllers, connect the controller to the adapter in pairing mode using a MiniUSB to USB-A cable (external power might be required, especially if the controller isn't charged). This will pair the controller with the last Bluetooth dongle that was plugged into the adapter while it was powered on. If the Bluetooth dongle hasn't been used before, it must be plugged into the adapter first while the Vectrex is powered on, and then hold the button on top of the adapter down while it is unplugged, before connecting the DualShock 3 controller which should pair automatically after which all the red lights on it will blink slowly. Turn off the Vectrex, connect the Bluetooth dongle again, and now when the Vectrex is powered on the DualShock 3 controller should connect after the PS button is pressed just like PS4/5 controllers.
Once a controller has been paired with the Bluetooth dongle that's plugged into the adapter, it can be connected by pressing the controller's PS button while the dongle's light is flashing slowly. The light on the controller should blink until it is connected, after which the blinking pattern of the light on the Bluetooth dongle should also change.
Also see the summary below.
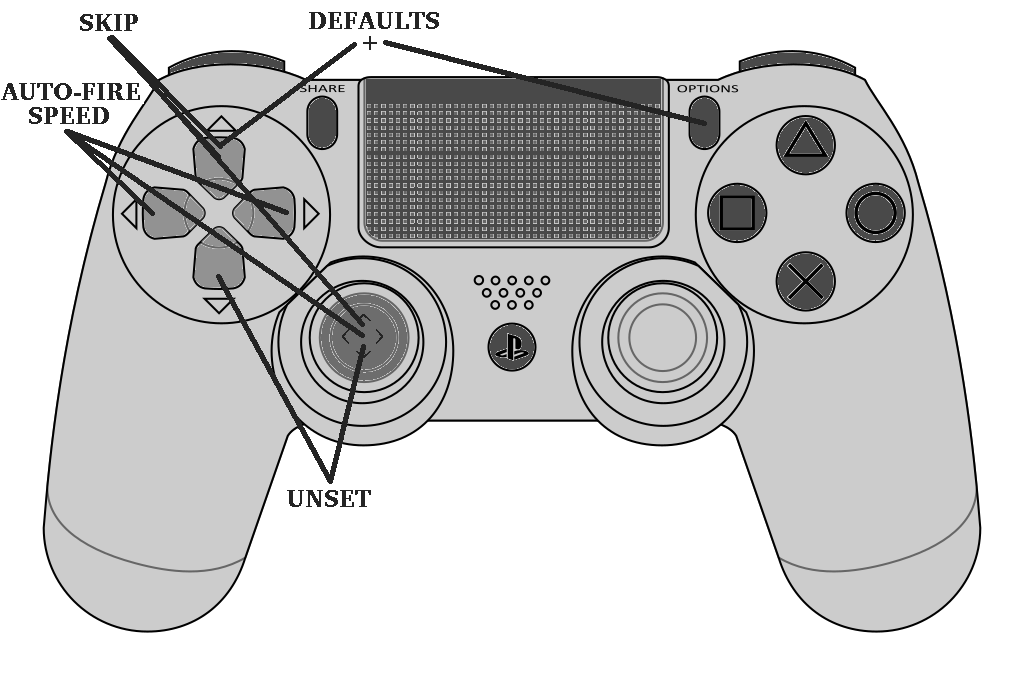
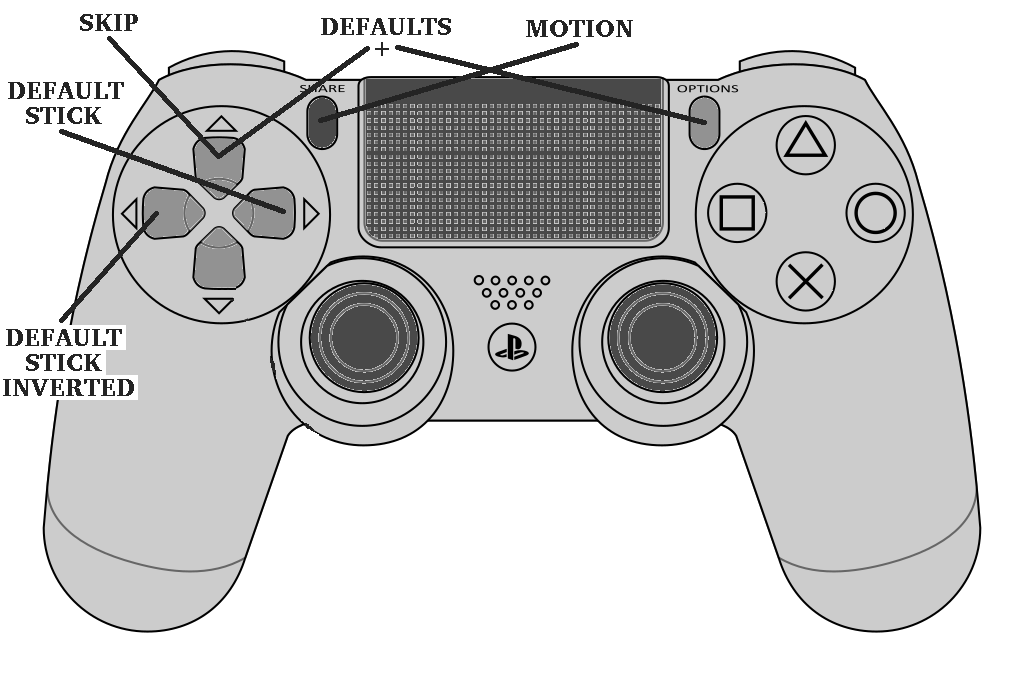
Button and joystick inputs are selected in setup mode, which is entered by pressing the button on top of the adapter after a controller has been connected and the Vectrex is switched on. This button can be pressed again to abort setup and use the previous settings. Pressing the UP direction on the D-pad skips a setting, leaving it unchanged. Moving the joystick up has the same effect in the button assignment stages. On DualShock and DualSense controllers, press OPTIONS and UP (START and UP with DualShock 3) at the same time to reset to defaults and exit setup mode.
Settings are stored separately for three different classes of controllers: PlayStation controllers, PC USB controllers/joysticks, and USB mice.
If possible, it is easiest to run the Vectrex test cartridge ROM (test.bin) and use the controller test screen to show the controller inputs during setup.
If a centred joystick isn't seen in the exact middle position by the Vectrex, hold it in the centre when you press the setup button and this will be saved as the new centre position after setup ends (but not if either axis is in motion sensing mode).
For USB mice, press and release both LEFT and RIGHT mouse buttons together to skip a setting. Press and release all three buttons (LEFT, MIDDLE (mouse wheel), and RIGHT) to unset all the button inputs, return other settings to defaults, and return to the start of the setup sequence. Note that mouse wheel movement and any extra mouse buttons aren't available as inputs.
Selectable inputs are darkened
In this first stage of setup mode, a Vectrex button input is 'pressed' by the adapter until the desired corresponding button on the controller is pressed, UP can be pressed on the D-pad or the joystick to skip changing that button assignment, or DOWN to leave that button unused.
Vectrex controller buttons 1-4 are set this way, beginning at button 1 and advancing after each assignment.
Selectable inputs are darkened
After the regular button 4 assignment, the button 1 input is automatically pressed at the auto-fire speed until it is assigned like before and it moves on to the next Vectrex auto-fire button assignment. Again UP/DOWN skips or unsets the assignment. Also LEFT/RIGHT movement slows down or speeds up the auto-fire speed within a range of six speed settings and it presses down all the Vectrex button inputs briefly each time to show the change in auto-fire speed, unless the setting is already at the end of the range (with the Vectrex test ROM, adjust auto-fire speed at the button 3 or 4 assignment stage to avoid accidentally moving off the controller test screen).
When using a USB mouse, jerk the mouse left/right to reduce/increase the auto-fire speed.
Selectable inputs are darkened
In the sequence of UP, DOWN, RIGHT, LEFT, each Vectrex joystick movement is assigned to the direction that a joystick on the controller is moved. UP/DOWN and LEFT/RIGHT pairs use the same joystick input, but you can have one joystick for UP/DOWN and another for LEFT/RIGHT. If the joystick is moved LEFT or DOWN while in the RIGHT or UP stage, or RIGHT or UP in the LEFT or DOWN stage, the joystick input is inverted. In this setup stage the Vectrex joystick input moves back and forth automatically in the direction of the current assignment.
On PlayStation controllers, extra analogue inputs can be selected. Press the L2 or R2 analogue buttons and they are assigned to the current direction input as well as the current joystick input. Click the touchpad to use it for an input. Press SHARE (DualShock 4) or SELECT (DualShock 3) to use the motion sensing input (not working with DualSense). Touchpad and motion inputs apply to both axis pairs (UP/DOWN, LEFT/RIGHT), so the setup sequence will skip over the second stage in the pair if they're selected. The motion sensing works best on just one axis.
The RIGHT D-Pad button sets the current joystick movement to the default joystick input, and LEFT sets it to the default but with movement inverted. Inversion also affects the D-Pad inputs, but otherwise D-Pad mapping can't be changed.
When using a USB mouse, move the mouse a small distance in the direction you want to associate with the current Vectrex joystick movement. Movement is mapped to up/down and right/left pairs so there are only two stages here instead of four. Pressing the left or right mouse button decreases or increases the mouse speed within a range of five settings. All the Vectrex button inputs blink to show when the speed setting is changed, and the speed of the current Vectrex joystick input back and forth movement changes correspondingly. Pressing the middle button (scroll wheel) toggles whether or not the mouse position will wrap around when it reaches maximum.
There are five banks of settings that can be saved separately for PlayStation and PC USB controllers/joysticks. The settings bank is selected if when the controller is connected or the Vectrex is powered on the default joystick is held all the way in one direction, or a D-pad button is pressed (the D-Pad on DualShock 3 controllers doesn't work for this - use the left joystick). Otherwise the default settings bank is used.
All the settings banks have the same default values. There's no way to change settings bank during use except by disconnecting and reconnecting the controller.
Settings banks aren't available with DualShock 4 or DualSense controllers over Bluetooth (they do still work for the DualShock 3 - release the joystick after the lights on the back of the controller stop flashing to show that it's connected).
Summary of controller input functions in each stage of setup mode, entered by pressing the button on top of the adapter:
All Stages of Setup
Setup Stages
Each stage of setup mode has four sub-states. For each button 1-4, and joystick directions up, down, right, and left.
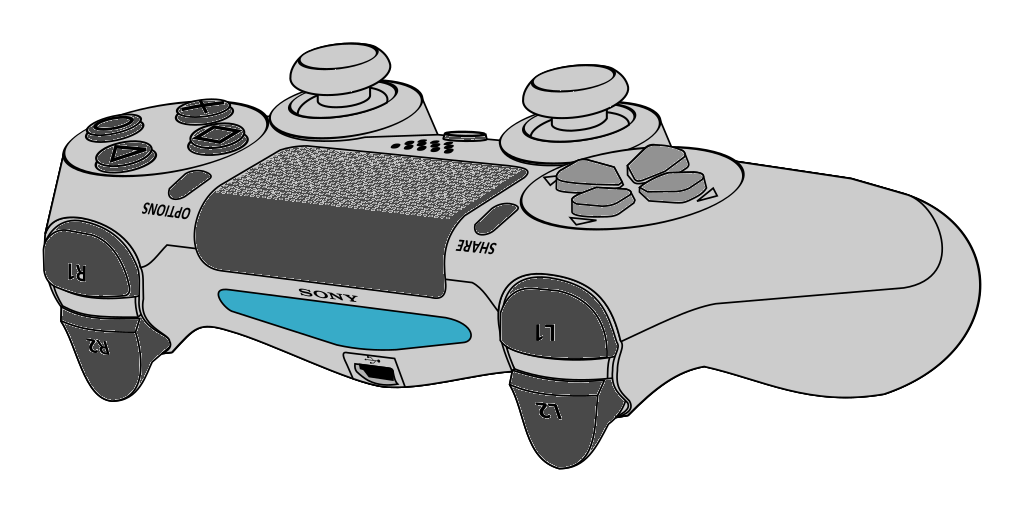
DualShock 4 controller images are based on images drawn by Tokyoship, licensed under the Creative Commons Attribution 3.0 Unported license. "Sony", "PS3", "PS4", "PS5", "PlayStation", "DualShock", and "DualSense" are trademarks of Sony Group Corporation.