V1_Release
- Edit
- Recent Changes
- Advanced Search
- All Pages
- Administration
- Index
V1_Release 
This guide describes how to get the PiTrex set up and running games on the Vectrex.
Hardware
A Raspberry Pi Zero with GPIO header installed is required. The "Raspberry Pi Zero WH" model comes with this already soldered on, and also supports WiFi and Bluetooth which might be used by some future PiTrex software. The new "Raspberry Pi Zero 2 W" is now supported, but does not improve performance.
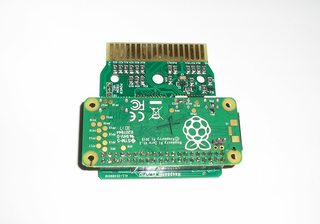
Insert the Raspberry Pi Zero into the GPIO header socket, with it overhanging the PiTrex board as pictured. If the MicroSD card is already in the Raspberry Pi Zero, avoid pressing on it during insertion in the GPIO header socket.
The software that runs on the Raspberry Pi Zero is stored on a MicroSD card inserted in the side, which is usually purchased separately. Any size MicroSD card currently manufactured should suit, so long as its capacity is no larger than 256GB.
You'll also need a PC with a MicroSD card reader (or an SD card reader, and a MicroSD-SD adapter).
Software
The PiTrex software should be installed on a MicroSD card that has been formatted FAT32. Windows will not format drives larger than 32GB as FAT32 using its built-in format tool, so if you have a MicroSD card larger than 32GB and it's not already FAT32 formatted, a 3rd party tool such as FAT32format GUI  can be used. On Mac it may be possible
  to format FAT32 using the "Disk Utility" program, or you may have to do it from the command-line as described by Malban at his download page below. Linux users may use the graphical tool available in their distro, or "mkfs.vfat" at the command-line.
Malban's bare-metal software packages are currently the most advanced in development. Download the latest "SD_DRIVE" release of Malban's Bare-Metal environment from his download page  . This is a ZIP file containing a folder named "SD_DRIVE". Copy everything inside the "SD_DRIVE" folder over to the empty FAT32 formatted MicroSD card.
With the PiTrex inserted in the Vectrex cartridge slot, and the MicroSD card in the attached Raspberry Pi Zero, the Vectrex can be turned on and after a few seconds delay an animated PiTrex graphic should be displayed on the Vectrex screen. Press a button to enter the menu, where you can select a game to run with button 4. To return to the menu from a running game, press all four controller buttons at once. In Vectrex games this will also save your position in the game, which you can return to later by selecting the game at the menu using button 1.
Note that all software currently available for the PiTrex is under active development. Not all arcade emulations are playable as a result of graphics issues and incomplete adaptation to the Vectrex controller. There are currently no sound effects in most of the arcade emulators.
Calibration
To account for variations between Vectrex consoles, calibration settings may need to be adjusted for best results. See the "settings" item in the menu for calibration options. Inside this menu the controls are as follows (as of December 22nd 2021 release):
Joystick port one:
- UP/DOWN - change configuration item
- LEFT/RIGHT - change the settings for the current item
- Button 1 - show help for the current selected item
- Button 2 - change the shown graphic
- Button 4 - exit (and save)
- Button 2+3 together - reset current configuration item to default settings
- Button 3+Joystick - move graphic
- Button 2+Joystick LEFT/RIGHT - change settings value in larger steps
ROMs
Besides some ported open-source games such as ZBlast, Hyperoid, and Elite (a new kind), other games are all emulations of either the Vectrex or vector arcade machines. Freely distributable ROMs for the Vectrex are included with the ZIP file and should work right away. However the arcade emulators require ROM packages from MAME to be added in the "roms" folder. See the "roms.txt" file inside that folder for a list of the filenames and sizes of each ZIP compressed ROM file that can be used with the PiTrex arcade emulators.


