Developer_Release_HW_Guide
- Edit
- Recent Changes
- Advanced Search
- All Pages
- Administration
- Index
Developer_Release_HW_Guide 
This guide describes hardware set-up for the PiTrex Developer_Release.
Step 1 - Preparing the Pi
GPIO Header
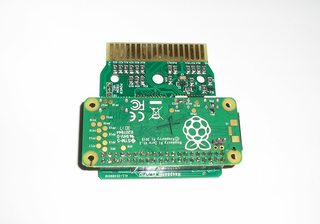
If your Raspberry Pi Zero (Pi0) has the GPIO header already installed (such as the "Raspbery Pi Zero WH" model), then this is as simple as inserting the Pi into the GPIO header socket at the end of the PiTrex cartridge. Ensure that the Pi is orientated so that the MicroSD Card slot is on the left when looking from the rear of the PiTrex cartridge circuit board, as shown in the photo.
If your Pi0 hasn't got a GPIO header installed, then a 40pin male header needs to be installed. This can be a regular through-hole header that needs to be soldered, or solderless "hammer headers" can be used (Graham Toal may be able to help with obtaining and installing these).
Using a right-angle header can help with connecting cables to the Pi0. A ribbon cable can be used so that the Pi0 is kept separate from the PiTrex cartridge, allowing easier connection of cables to the Pi and also use with full-size Raspberry Pi boards like the Pi3 and Pi4 (PiTrex software on Linux will likely need to be recompiled for the Pi3 or Pi4, and the Bare-Metal environment currently isn't compatible). See Mechanical_Description for examples.
Case
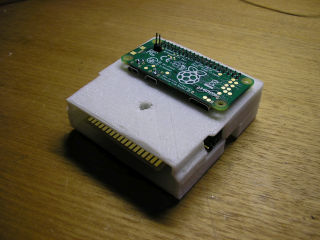
Though the PiTrex cartridge can be used without a case, it is designed to fit within a standard Vectrex cartridge case in which a hole has been made for the GPIO header socket (models with the DC socket installed require more significant modification). Reproduction cartridges have been successfully modified using a Dremel tool, or Graham Toal plans to make modified reporduction cases available for sale to users in the USA.
A 3D printable case design is available that suits models with and without the DC socket. This is pictured above and can be printed on any home 3D printer with at least a 100x100mm build area (the large majority do).
More details about cases are available in Mechanical_Description, including download links for the 3D printable case.
Step 2 - Accessing the Pi
Although a desktop can be installed on the Pi0 and accessed directly or via remote desktop, this guide will focus on terminal (command-line) access because a desktop environment is not required for development and running one will impact the performance of the Pi0 when running PiTrex software.
Where SSH is used, X port forwarding can provide access to individual GUI programs running on the Pi, such as a text editor, IDE, or file manager. Command-line SSH clients commonly enable this with the "-X" parameter. On Windows this will require an X Server to be installed and configured.
Note that the direct serial connection method is currently the only option supported in the Bare-Metal environment for using the debugging interface. Bare-Metal programs can be started simply by placing the binary on the first partition (FAT formatted) of the MicroSD card, with the filename "kernel.img". The config.txt file can also be edited to choose the name of the binary file to be booted, or the PiTrex menu can be used to select the binary to load with the Vectrex (currently only boots file names that have been compiled-in).
Direct connection
The most obvious method of accessing the Pi0 is to connect a monitor and keyboard like a regular PC. The Pi has a Mini HDMI port that can be used to connect a monitor (Composite video is also available by soldering a connection to the board), and a Micro USB port that can be connected a USB keyboard. Note that the outer Micro USB port is only for attaching a power supply, only the inner port will work for connecting USB peripherals. Adapters to full-size USB and HDMI connectors will probably be required.
The problem with this is mostly physical, because in the standard configuration the Pi0's Micro USB and Mini HDMI ports face the side of the Vectrex when the cartridge is inserted, there is not enough room for conventional cable connectors to fit. Special FFC cables are available from some online retailers and have been found to fit within the gap, they also adapt to full-size HDMI and USB connectors, see Mechanical_Description for examples.
If using the Raspberry Pi Zero W or Zero WH, a bluetooth keyboard could be used so that only a physical HDMI connection is required (still requiring one FFC cable for that).
Network Connection
With a network connection, remote terminal protocols such as SSH can be used to access the Pi0 from a client such as "ssh" on Linux/Mac or "PuTTY" for Windows/Linux/Mac. See the software guide for more information on how to connect with SSH.
Connecting to the internet from the pi0 is also possible using these methods, though to do so over a USB OTG/Gadget connection, or a serial connection via PPP, may require some additional configuration.
WiFi / USB Network Adapter
The Raspberry Pi Zero W and Zero WH have built-in WiFi support. With this they can connect to any available WiFi network, and other computers on the same network can access it using its IP address. This requires that your WiFi settings have been entered into the configuration of the Pi0, and that you know the IP address that it gets assigned. See the software guide for instructions on configuring up WiFi settings on the Pi0.
For a Raspberry Pi Zero, or where WiFi connections aren't possible, a USB WiFi or Ethernet adapter could be used. See the Direct Connection section for notes on the issue with access to the USB port. Note that some adapters might not be Linux compatible.
USB OTG/Gadget Connection
Currently this method hasn't been tested. It's possible that the configuration required to eliminate Vectrex display gitches in Linux will mess with it.
Note that this may require the following line in config.txt:
dtoverlay=dwc2,dr_mode=otg
All Pi0 models can connect directly to a PC over USB as a USB "Gadget", and this can be used to establish a network connection, avoiding the need for WiFi configuration or a compatible USB Ethernet or WiFi adapter.
Again, the issue with access to the USB port on the Pi0 is present, as descibed in the Direct Connection section. This time a cable should be used that goes from the Pi0 to a USB Type-A Male plug suitable for connecting directly to a PC's USB port.
If using this method while the PiTrex is connected to the Vectrex, the POWER FROM VEC. jumper must be removed because the Pi0 will be powered from the PC's USB port. On models without this jumper fitted (models without the DC socket), the wire link over the jumper pins can be cut to permanently disable powering the Pi0 from the Vectrex.
See these guides for instructions on setting up the Pi0 for a USB OTG/Gadget network connection:
- Turning your Raspberry Pi Zero into a USB Gadget

- Setting up Pi Zero OTG The quick way

- Raspberry Pi Zero USB Ethernet Gadget Tutorial for Windows

Over Serial Connection Using PPP
It is possible to establish a network connection to a PC with a serial connection to the Pi0, using Point-to-Point Protocol (PPP). See the software guide. Transfer speeds will be slower this way than with other methods.
Serial Connection
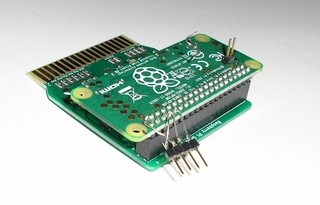
This requires soldering four wires to the GPIO header solder joints on the Pi0 or the PiTrex board (for some adapters 3.3V may not be required, so only three connections are needed). The pin-out follows:
- Pin 1: 3.3V
- Pin 6: GND
- Pin 8: Tx
- Pin 10: Rx
In this image the pins have been soldered to a four-pin header for easy connection:
Or they can be wired to a cable.
To make sure that the serial terminal is enabled, add this line to config.txt in the first partition of the Pi0's SD card (/boot/config.txt on the Pi0):
enable_uart=1
The terminal is accessed via a serial port on a PC, using a serial terminal program such as PuTTY  for Windows/Linux/Mac. USB serial adapters are commonly available for purchase online. It is important that the serial port adapter used is for 3.3V logic, not 5V. Note that the Tx output from the Pi0 should go to the Rx input on the PC serial port, and similarly the Pi0's Rx input should go to the PC's Tx output.
The Baud rate used is 115200. More details about the Raspberry Pi serial port  .
.
Done
Now you've sorted out how to connect your Pi0 to the PiTrex cartridge and the Pi0 to your PC. Head over to the software guide to find out how to set up the software on the Pi0 for running and developing games.
Future Developments
There are some hardware features that have been planned or suggested for use in PiTrex software. Though not used in current software, these may be worth consideration when deciding on the hardware configuration to use in order to make compatibility easier in the future:
- Online updates and smart-phone integration with PiTrex software. This will rely on the Pi0 having a WiFi interface.
- Support for using USB and/or Bluetooth video game controllers connected to the Pi0.
Also see Linux_Configuration.


